As beekeepers we are responsible for the health of our hives and our apiaries as a whole. Let me bring to your attention the following 3 step approach. Firstly you need to educate yourself on the potential threats to the health of your hives.
Secondly we need to take the time to regularly and thoroughly examine all the hives in our apiaries. This includes Flow Hives that offer a convenient honey extraction process. We constantly need to be regularly checking the brood boxes of our hives. This will allow us to recognise any changes in the health of the bees and identify potential problems as early as possible.
Thirdly we need to implement strategies to beat the health threat. Some health issues that a hive can get, if left untreated, can not only kill the hive but potentially take out your whole apiary and possibly infect other apiaries nearby.
In this article we are going to take a close look at Chalkbrood. Chalkbrood is a common disease and most beekeepers including backyard beekeepers will come across it at some stage in their journey.
So, what is Chalkbrood? Chalkbrood disease or Ascosphaera Apis is a fungus. It produces spores that infect the larvae in the brood of the hive. The spores germinate and feed from inside the gut of the larvae, as a result, the larvae die of starvation. The white fungus, once inside each brood cell multiplies and releases millions more spores.
Chalkbrood – Know It
It’s important to remember that if you find chalkbrood in your hive this doesn’t mean you are a bad beekeeper. It’s a common disease and the good news is there are strategies to help your bees combat it.
What countries have Chalkbrood disease?
It is not known for sure where chalkbrood disease originated. It has been well known and widespread in the northern hemisphere where winter temperatures are cold and summers are mild. Chalkbrood had been identified in Europe, Scandinavia and Russia by 1932 and New Zealand by 1957. It wasn’t officially declared present in the USA and Canada until 1970 although there is suspicion it was present as early as the 1920’s.
Clalkbrood has since been discovered in Mexico, Argentina, the Philippines, Japan and central America by 1985. It had also turned up in Australia by 1993.
So if you have discovered chalkbrood in your hive you are not alone. Chalk brood will most likely be wherever you are in the world.
Chalkbrood disease lifecycle
As mentioned earlier chalkbrood is a white fungus. Chalkbrood fungus grows from spores that are in the food that is fed to growing larvae in brood cells. The chalkbrood spores germinate in the stomach and feed from the food in the larvaes stomach.
The growing fungus produces mycelia which are white, chalky and fluffy in appearance. The fungus will continue to feed on the nutrients in the brood cell starving the larvae to death. The fungal growth will take over the whole cell within a few days.
There are two types of mycelia produced, as these two types contact each other they produce a bluey green fruit. The developed fruit contains millions of spores. When these spores are released they are inadvertently carried by adult bees (without harming the adult bee) around the hive. These spores are still able to infect larvae for up to 15 years.
Infected larvae become white mummies before turning grey and then hardening to black mummies on completion of the fungal life cycle.
How do beehives get chalkbrood disease?
Typically a strong hive will not get chalkbrood disease. It is hives that are under stress that are susceptible to chalkbrood disease.
Weak hives are prone to an outbreak of chalkbrood. Here are some common factors that contribute to a weak hive:
1. Winter exposure
The hive did not WInter well. Possibly the bee cluster got cold during the WInter due to low bee numbers, low stores of pollen and honey or exposure to very cold conditions. Ultimately the brood on the edges of the cluster has been two cold. This can be made worse by the over supering of hives during times of stress.
2. Starvation
Exposure to an extended period of drought conditions where there is very little supply of pollen and nectar to sustain the hive putting the hive under stress.
3. Another disease
For example Nosema which is like dysentery for bees. This will weaken and stress the hive.
4. Failing or old Queens
This leads to a reduction of young bees and the overall strength of the hive. Regular requeening is good practice. Spring is the best time to do this.
5. Moving of hives
Continual moving of hives can cause stress to the hive and increase susceptibility to chalkbrood.
6. Quality of combs
Old or damaged combs detract from the well being of the hive and should be replaced by combs with new foundation. This should be an ongoing process but is best done during Spring or Summer honey flows.
The strength of numbers
A strong hive has many bees available to make sure the hive is clean. This means any larvae that die in the brood cells are quickly and efficiently removed from the hive.
This does not allow the chalkbrood fungus to complete its fungal life cycle. With no fruiting of the fungus, there are no fresh spores released and the chalkbrood disease is managed by the hive.
So in a strong hive chalkbrood will struggle to establish itself meaning there will be little impact on the performance and health of the hive.
How do chalkbrood spores get into the hive?
There are a few common ways that spores from the chalkbrood fungus can get into a hive.
1. Robbing
A weak hive becomes susceptible to robber bees coming in from other hives to steal their resources. This goes both ways, a robber bee can transfer spores from an infected hive back to their own hive or a robber bee from an infected hive could bring spores into the hive they are robbing.
2. Equipment
The beekeeper can transfer spores on equipment. For example, spores can be transferred on frames if they are exchanged possibly after the honey has been extracted. Maybe a super that has come from an infected hive is placed on another hive.
Remembering these frames or supers could have been stored for up to 15 years and still carry active chalkbrood spores. Even the humble hive tool could spread spores from hive to hive.
3. Drift
Drift can occur in apiaries with multiple hives close to each other. Foraging bees originating from an infected hive can inadvertently return to the healthy hive next door. Usually, the guard bees would stop other bees from entering, however quite often bees loaded up with pollen and nectar will be allowed in even if they are from another hive.
Now that we know what chalkbrood is, let me recap. Chalkbrood is an infectious fungus that attacks the larvae in the brood cells of the hive. Our weaker hives are far more susceptible to it. We also know chalkbrood can be transferred from hive to hive by robber bees, on beekeeping equipment or by drift. Let’s now look at how we identify it.
Chalkbrood – Identify it
Before we can beat the chalkbrood disease we need to be able to identify it. Fortunately, chalkbrood is relatively easy to identify. You can often recognize your hive has chalkbrood without even looking inside the hive. Let’s take a look at the telltale signs of a Chalkbrood diseased hive.
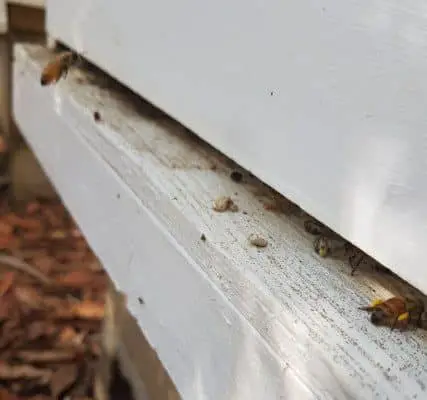
1. Check the trash
A good practice is to spend time regularly observing the activity or your hives at the entrance. I don’t mean just how active they are, I mean check what they have tossed out as trash.
It may be worth putting a white cover on the ground in front of the hive for a day or two. You are looking for evidence of the hard black or white mummies that are the dead larvae the chalkbrood fungus is growing on. The bees should be removing these from the brood cells tossing them out the entrance of the hive.
2. Check the brood combs
This means digging your way down to the brood box and removing frames from the brood cluster to examine them for signs of chalkbrood.
Again we are looking for cells that contain the white chalkbrood mummies. These should be easy to identify particularly if they are on a dark comb.
They are typically scattered around the edges of the brood cluster. There will more than likely be evidence of the hard black mummies. Because these have shrunken and dried they can sometimes rattle in the frame.
3. Check the floor of the brood box
As you are pulling out the frames in the bottom brood box have a look on the bottom board of the hive. If the hive has chalkbrood there will usually be mummies on the floor. These have been pulled from the brood cell but are yet to be taken out the entrance of the hive.
Often in weaker hives that have chalkbrood, there will be piles of these mummies around the bottom board as they have not been able to get all the mummies out the entrance.
With these simple checks, you should be able to identify whether the chalkbrood disease is present in your hive. If you do discover it, there is no need to be alarmed. There are some effective strategies you can employ to reduce the chances of it spreading to other hives in your apiary and to bring your infected hive back to health.
The video below has some good close up footage of chalkbrood. It is worth checking out so you can better identify potential chalkbrood in your hives.
Chalkbrood – Beat it
Equipment Management
Firstly we need to make sure we minimise the risk of accidentally transferring chalkbrood spores to other hives in our apiary. Here are the precautions we should be taking:
1. Sterilize your hive tool
After inspecting and identifying chalkbrood disease we need to sterilize any hive tools that have come in contact with the affected hive. A quick effective way to do this is to directly heat the hive tool with a blow torch. The heat of the flame on the tool instantly kills any spores.
We use a butane torch, they are very affordable and portable. We take it with us whenever we are looking at our hives. It allows us to quickly sterilize the hive tools between hives as we work through our apiary.
Definitely don’t use kerosene or petrol as the smell of the residue will aggravate the bees next time you use your hive tool.
2. Quarantine equipment
Don’t transfer frames, supers or lids from an infected hive to another hive. Our practice is to not reuse combs from hives that have had chalkbrood. We render any surplus combs from frames off infected hives in our wax melter rather than risking having them contaminate another hive. We also clean and re-paint any supers before using them on another hive.
Support the Hive
The next thing to remember is that strong hives can beat chalkbrood disease. The spores may be still around, but if the hive is strong enough the bees will quickly clean out any cells that the chalkbrood fungus germinates in.
So the aim here is to take action to minimize the exposure of the hive to spores and to assist the hive in growth. This can prove difficult if you are coming into Winter in a cold climate. If however, you have been diligent in checking your hive through the Summer and Fall you should be able to get onto it early.
Here are some strategies to help your hive beat Chalkbrood disease:
1. Reduce hive size
Hives infected with chalkbrood are often weak. Reduce the size of the hive removing a super, sorting through the frames and removing empty frames. If possible removing frames with chalkbrood mummies. This means the bees don’t use any extra resources and energy cleaning up those frames.
The frames that you have removed can’t be put in another hive. The wax in the frames will be perfectly ok to render and sell.
The benefits for the hive after our intervention means less housekeeping, easy temperature regulation and it also forces the queen to keep her brood nest closer if you haven’t been running a queen excluder.
2. Help clean up
In the brood box, you will find chalkbrood mummies. If you tip the bottom box towards the entrance of the hive and tap the base with your hive tool the mummies will roll out the entrance saving the bees the effort and removing sources of chalkbrood spores.
If there are lots of mummies on the bottom board it may be easier to lift out all the frames from the bottom brood box and give the bottom box a proper cleanout.
3. Feeding
In order to help the weak hive make a recovery as soon as possible, you can feed the hive pollen supplement and offer sugar water if there isn’t much nectar flow.
Alternatively, if you have that availability from another strong hive you could add a good frame with some capped brood, pollen and honey to the weak hive.
4. Re-queen
A possible reason for the hive becoming weak in the first place is that the queen may not be performing. It’s important to take a close look at her brood patterns and the amount of drone brood in the hive.
It might be worth re-queening particularly if you are investing in that hive with a frame or two of brood and resources from another hive. Hives do perform better with young queens.
5. Regular checks
It is now a matter of monitoring the hive. If you have added a frame of brood this will be like a bee bomb within a week there will be a lot more nurse bees. You have provided the food and the extra bees and the queen should be laying her little heart out.
Within three to four weeks there should be significant improvement in hive strength. Don’t forget if you have reduced the size of the hive to be ready to make space again to avoid risk of swarming.
With the improving strength of the hive, the bees should be removing the remaining chalkbrood. It’s a good idea to replace the brood box itself with a fresh clean one, once you are no longer seeing evidence of chalkbrood at the entrance of the hive, or in any of the frames.
This process gets rid of any chalkbrood spores that may be on the floor of the brood box. The brood box you have removed can be cleaned and repainted to be used again when you need it.
The Wrap Up
It can be a worry when you notice disease in your hive. Some diseases can potentially infect other hives in your apiary. The key is to know what you are looking for, understand how to identify a threat and implement the strategies to beat it.
Chalkbrood is infectious and can contribute to the death of a hive if left unchecked. The good news is, it is treatable, through some good practices to help the bees build up and remove the chalkbrood disease themselves.
Sources:
https://www.agrifutures.com.au/wp-content/uploads/publications/14-098.pdf
https://www.hgsc.bcm.edu/sites/default/files/images/review_Chalkb.pdf