Whether you are a beekeeping veteran or you’re just venturing into the buzzing world of bees, you surely know the meaning of a high-quality bee smoker. The mediator that keeps the relationship between the bees and the beekeepers civil and painless is one of the essential tools in beekeeping.
Having a bee smoker of decent quality is one thing, but knowing the secret to properly maintain the device, is a real game-changer that would make your life much easier. It will not only ensure the longevity of your smoker, but it will also make lighting the device easier, and most likely prevent unnecessary stings from agitated bees or other potentially dangerous side effects.
Read on to learn the correct way to use a bee smoker should you choose to go that route, as well as the steps needed to maintain your device.
What is a bee smoker?
An ordinary-looking metal device, a bee smoker is not a beekeepers’ guarantee of a stingless inspection of the hives. However, beekeepers do use the smoker to calm the honeybees, by puffing smoke into the hive.
For a comprehensive look at why beekeepers use smokers on beehives check out this article we have written, Why Do Beekeepers Use Smoke?
Bees have the ability to alert other bees that the hive is in danger by releasing certain pheromones. These pheromones act as an alarm response system to signal other bees to be ready to attack anything that appears harmful. Smoke, however, interferes with the bees’ signal reception system and disguises these pheromones, so the hive can no longer detect the “code red” released in the air.
The device creates smoke by burning various fuels which can include items such as cotton and burlap.
Puffing smoke to bees to access the honey is nothing new and the practice dates as far back as ancient Egyptian times. Ancient Egyptians would burn cow dung in ceramic pots and pans to create smoke. The technique has mostly stayed the same even today, only the device has changed. The classic single-handed smoker was created in 1875 by the first commercial beekeeper in the U.S, Moses Quinby.
While not all beekeepers believe in using a smoker, some swear by it and won’t go without it. Opening a hive without a smoker is surely a risky business, even for the most experienced of beekeepers.
Do you also know that it might be possible to use a bee smoker on a wasps nest? If you have a bee smoker and a wasp problem it might be worth checking out this article we have about using a bee smoker on wasps nests. The article is called, Would a Bee Smoker Work on Wasps?
What are the different parts of a bee smoker?
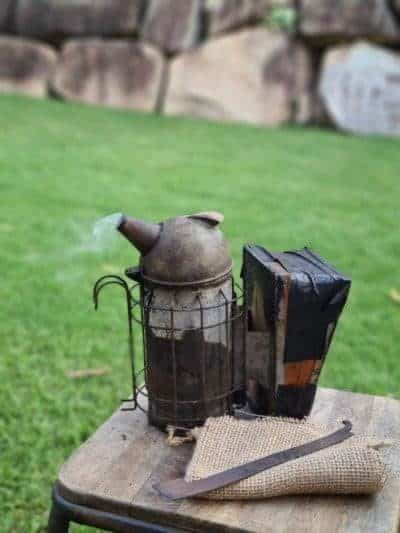
All modern bee smokers come with a few basic features. They generally have a chamber for storing the fuel used to create the smoke, a nozzle to direct the smoke, and bellows to assist with pumping fresh air into the chamber, as well as pushing smoke out the other end.
The smoker is covered in a heat protection cage, or heat shield, to prevent the user from burning their hands.
A mounting hook will come in handy as you can hang your device when not in use. It is not necessarily to buy an expensive smoker as it is possible to make your own, especially if you know how to and enjoy working with your hands.
Steps to correctly use a bee smoker
If used correctly, you will probably not get stung by a single bee while working on the hive. It is probably best to practice lighting your smoker before you take it to the beehive, just to ensure you know what you are doing.
Choose a windless day as you can direct the smoke, plus you won’t have to make several attempts to get your smoker started in the wind.
Some beekeepers claim that burlap smoker fuel is easier to use, however with time and experience each keeper finds their own favorites.
Take enough fuel to ensure you have enough smoke for the duration of your inspection.
Some beekeepers suggest opening the box and giving it a few puffs of smoke to get the hive to prepare. A good rule of thumb is to give no more than two puffs of smoke at the entrance of the hive, and then observe the behavior of the bees.
Each hive reacts differently, and too much smoke could cause the queen to flee the hive-risking the future of the colony. Close the lid to give the bees time to get focussed. It is then safe to open the box.
Once open, give a few puffs of smoke 8-10 inches away. Spraying a few puffs of smoke around yourself should prevent bees from flying into you. You can also continue giving puffs of smoke at five-minute intervals while you work.
The effect on the bees will wear off after 10-20 minutes.
Always keep in mind that the times and quantity of smoke provided by this, and any other guide simply a reference.
Each hive should be treated as an individual live organism and therefore act according to the way the colony reacts.
How to light a bee smoker?
There are not many things more frustrating than reaching for your smoker in the middle of an inspection or harvest, only to find it has gone out.
One of the most important things you will need is a good smoker fuel. Without one it is virtually impossible to have a good fire.
The same basic principles as when building a campfire apply.
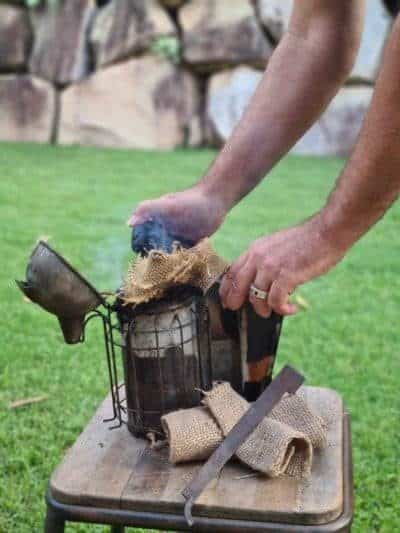
You will need some quick-burning material to get the smoker started and plenty of oxygen around the material to get it started.
- The starter fuel should be light, fluffy, and not compact. Light the fuel using a lighter (do not use gasoline or firelighters).
- Once the fuel is alight, give a few pumps to the bellow in order to add oxygen.
- Once it burns, push the material down with your hive tool.
- Once the fire is properly burning you can add more material
- Squeeze the bellow a few times and repeat the process of adding more fuel to the smoker. You can then add your bigger fuel and close the lid.
- Remember to check your smoker from time to time to ensure there is still enough material.
When lighting and using your bee smoker, there are two hail marys that you should always keep in mind
Always light it from the bottom and then add fuel to the top. This will ensure that all the fuel inside the smoker burns, and not only the top layer.
Once the smoker is hot, it stays hot for a while. Do not forget about your smoker once you have finished using it. Putting it on a wooden table or touching it could cause some nasty burns.
Maintaining your smoker
Having a clean well-maintained smoker helps both lighting the smoker and the smoker staying lit.
From the maintenance perspective, there are a couple of things that you should keep in mind.
Making sure the bellows are in good working order: There should be no holes in the bellow. Holes will allow oxygen to escape from the bottom and not provide a proper “pump” of air.
Clear the smoker of ash: Before using the smoker make sure the grate at the bottom inside the smoker is clear of ash or half burnt fuel from previous use. Old ash can cause a blockage for oxygen and therefore your fuel will not burn efficiently.
Remove resin from nozzle: Some types of smoker fuel, such as pine needles, are high in resin. This resin will start to build up inside of the nozzle and smoker pot.
Neglecting your smoker can lead to the restriction of airflow through the smoker over the long term, similar to not cleaning your kettle barbecue, which causes less oxygen to flow freely, making it hard to keep the fire alight.
How to clean a bee smoker
There are several ways to get the job done and many sources suggest different methods to clean your bee smoker. It is important to clean after every use, as soot build-up will prevent your device from working properly over the long term.
The cleaning can be as simple as removing old ash and resin buildup.
Full maintenance is crucial and it can be done a few times a year. While some sources suggest only scraping every part of your device and cleaning every part of it, others give instructions for a more thorough clean.
There are also method that use high heat to burn off resins that may be caked on the inside of the smoker.
The method we like is pretty simple and doesn’t require a crazy amount of heat which requires special tools and can by potentially hazardous.
The first step would involve scraping the soot from the inside of the device with your hive tool or a flat screwdriver.
Secondly, you should cover the air tube of the bellows with tape to prevent water from entering them.
A combination of hot water mixed with vinegar is also a popular soaking solution, soaking the device for up to 10 hours while hanging suspended in the bucket.
Lastly, you should then just use a rag to wipe your smoker as the vinegar solution would have done most of the hard work.
Cautions when using a bee smoker
Just as smoke can temporarily hypnotize and calm the bees, too much smoke or misusing the smoker can be harmful to the colony.
Common mistakes made by newbie beekeepers include using hot smoke, too much smoke, and opening the hive too soon after smoking. To ensure your smoke is cool enough and safe for the bees and their hive, use natural materials such as pine cones, wood chips, and natural fabrics.
Using artificial material can be toxic to the bees and the honey. Also, too much smoke can cause the bees to go into panic mode.
Puff smoke once at the entrance, and then sparingly during the inspection. After smoking the entrance, wait a bit and see how the bees react before continuing.
Also, remember to place your smoker on a surface when not in use. It is hot and might cause a bushfire if placed on the grass.
Because the device can be hot, some beekeepers hold the smoker by the bellows or attach a hook to prevent burning their hands
Different types of bee smokers
There are cone shape and dome shape bee smokers on the market. You can purchase a few different designs on a variety of different websites.
The Mann Lake bee smoker is a good option for those unsure of which smoker to purchase as it comes with rubber below, which shows less wear over the longer term. It is also a lightweight device, but sturdy at the same time. It also provides useful information with many of the other devices available on the market.
Alternatively, and relatively new to the market, electronic bee smokers are available. These smokers come with a small electronically powered fan, which is used to replace the bellow.
Although this may seem easier, most beekeepers tend to consider this an unnecessary extra expense that does not provide much of a benefit.
The Wrap Up
Keeping your bee smoker clean and well maintained will make hive inspection and honey harvesting a much simpler task, all while protecting your bees and allowing the colony to thrive.
The type of smoker you choose will always come down to personal preference, but the steps to using them and maintaining them will remain a constant.
Remember, good tools can make a hard job easy.